The Ultimate Guide of Container Gardening Watering Mistakes (And How to Fix Them)
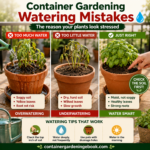
We have all been there. You step out onto your small apartment balcony or back patio, coffee in hand, ready to admire your new outdoor oasis. Instead, you look down to find a once-vibrant basil plant completely withered, a tomato vine dropping yellow leaves, or a flower basket looking dry and crispy. You instantly feel that wave of guilt, concluding that you simply do not possess a “green thumb” and are destined to be a certified plant murderer.
Disclosure: This post contains affiliate links. If you use these links to buy something, I may earn a commission at no extra cost to you. This helps support the blog and keeps the garden growing!
Take a deep breath. You are not a plant killer. The reality is much simpler: you are likely just falling victim to a few common container gardening watering mistakes.
When you shift from traditional in-ground backyard beds to compact patio pots, fabric grow bags, or window boxes, the physics of water and soil changes completely. In a container, a plant’s root system is trapped within a micro-ecosystem. It cannot stretch deeper into the earth to find hidden moisture reserves during a heatwave, nor can it escape stagnant pools of water if the soil is too dense. Every single drop of water you provide—or withhold—is amplified.
This comprehensive guide is designed to permanently banish your watering confusion and correct the most frequent container gardening watering mistakes. Sourced from the modern web consensus of agricultural scientists, Master Gardeners, and professional urban horticulturists, we will diagnose the exact blunders robbing you of fresh herbs, juicy vegetables, and beautiful floral displays. More importantly, we will provide a clear, step-by-step system to achieve perfect hydration and build your gardening confidence.
The Container Gardening Watering Mistakes Quick-Fix Reference Guide
If your patio plants are currently showing signs of distress and you need an immediate diagnostic tool to spot common container gardening watering mistakes, look at this above-the-fold reference chart to find your quick fix before diving into the core mechanics below.
| Mistake | What It Looks Like | Quick Fix |
| 1. Chronic Overwatering | Yellowing lower leaves, mushy stems, heavy, wet soil, and a distinct musty or moldy odor. | Stop watering immediately. Ensure drainage holes are unblocked and let the soil dry completely. |
| 2. Severe Underwatering | Wilted or crispy leaves, dry brown edges, container feels weightless when lifted. | Administer a slow, deep drench until water flows freely out of the bottom drainage holes. |
| 3. The Wrong Pot Material | Soil dries out within hours (porous pots) or remains a soggy swamp for days (non-porous pots). | Match your container material to your lifestyle or transplant your varieties into less finicky pots. |
| 4. Heavy or Dense Soil Choice | Water puddles on top of the soil, or the mix bakes into a hard, cracked, brick-like dry mud. | Repot the plant into a high-quality, lightweight, soil-less potting mix designed for drainage. |
| 5. Hydrophobic Soil Lockout | Water runs instantly out of the bottom holes while the core root ball remains bone-dry. | Submerge the lower half of the planter in a shallow tub of water for 20 minutes to force rehydration. |
| 6. Inconsistent Irrigation Cycles | Split tomatoes, bitter herbs, cracked peppers, or sudden flower bud drop. | Set a daily phone reminder. Transition to a steady moisture routine using the finger test. |
| 7. Sundown or Night Watering | White powdery mildew on leaves, fuzzy gray mold, or black stems at the soil line. | Shift your watering schedule exclusively to the early morning so leaves dry quickly in the sun. |
| 8. Ignoring Local Microclimates | Plants bake and wither unexpectedly on windy balconies or concrete heat islands. | Group containers together to boost humidity, add mulch, or move sensitive pots into afternoon shade. |
The Signature Framework: The 3-Step Watering Formula
To eliminate guesswork and avoid critical container gardening watering mistakes, professional growers throw away rigid calendar schedules (like “watering every Monday and Thursday”) and instead rely on a simple, sensory framework called the 3-Step Watering Formula. Memorize this routine to keep any container garden perfectly balanced:
- Check: Do not guess by looking at the surface of the dirt. Shove your index finger into the soil up to the second knuckle. If it feels damp, cool, and dark, walk away—your plant does not need water. If it feels warm and bone-dry all the way down, it is time to irrigate.
- Water: Grab your watering can and apply water evenly over the entire surface of the soil, not just around the central stem. Keep pouring until water actively streams out of the drainage holes at the bottom of the container. This deep soak ensures every root hair has access to hydration.
- Wait: Allow the top 1 to 2 inches of soil to dry out thoroughly before you pick up your watering can again. This intentional pause pulls fresh oxygen down into the soil pores, preventing root suffocation.
Expert Consensus on Container Irrigation
When you study the modern technical literature published by university agricultural extensions and botanical research teams, a definitive consensus emerges regarding container hydrology. If you want to maximize your success and minimize common container gardening watering mistakes, you must adhere to these five unbreakable laws of the container landscape:
- Deep Watering Beats Shallow Sips: Giving your plants frequent, shallow splashes of water keeps the bottom of the pot dry. Because roots grow toward moisture, this starves the lower root system and forces a weak, shallow root network right at the burning surface of the soil.
- Never Add Rocks to the Bottom of Pots: This is a legacy myth that actually creates severe container gardening watering mistakes. Putting gravel, stones, or broken pottery shards at the bottom of a container does not improve drainage; it creates a structural boundary layer (a perched water table) that prevents water from leaving the soil, causing root rot.
- Always Use Soil-Less Potting Mixes: Potted plants require massive amounts of structural oxygen. Traditional backyard yard dirt or topsoil contains heavy clays that collapse and pack down like concrete in a container, killing the plant’s ability to breathe.
- Morning is the Supreme Watering Window: Evapotranspiration data proves that watering at dawn hydrates the plant before afternoon heat stress hits while ensuring any water that splashes onto leaves dries quickly, preventing fungal infections.
- Self-Watering Planters Reduce Human Error: For busy professionals or complete beginners, utilizing sub-irrigation planters that deliver water directly to the root zone via capillary action cuts out nearly 80% of typical beginner mistakes.
The 8 Critical Container Gardening Watering Mistakes Deep-Dive
To fix a problem, you must understand the exact science behind why it happens, how to identify it, and how to prevent it from ever happening again. Let’s break down the eight primary container gardening watering mistakes beginners make on their balconies and patios.
1. Chronic Overwatering
The Symptoms
Your plant’s lower leaves are turning a pale, sickly yellow and dropping off without drying out. The base of the stems may feel soft, limp, or slightly mushy. When you pick up the container, it feels incredibly heavy, and if you get close to the soil, you notice a faint, sour, or musty odor.
Why It Happens
This is one of the most heartbreaking container gardening watering mistakes, often called “killing your plants with love.” When you water too frequently out of anxiety, the soil stays constantly saturated. This fills the tiny macro-pores in your potting media with water instead of oxygen. Plant roots require oxygen to perform cellular respiration; without it, they literally drown, suffocate, and break down, allowing opportunistic root rot pathogens to take over.
How to Fix It Step-by-Step
- Cease all watering immediately and remove any decorative saucers or trays holding standing water beneath the pot.
- Check the bottom of the container to verify that the drainage holes are completely open and not blocked by roots or debris.
- Gently slip the plant out of its pot if possible to inspect the roots. Healthy roots are white and crisp; rotted roots are black, slimy, and easily fall apart. Trim away dead roots with sanitized scissors.
- Place the container in a bright, warm, well-ventilated spot and do not touch it again until the soil is thoroughly dry down to the mid-pot level.
How to Prevent It
Commit completely to the 3-Step Watering Formula. Never add water to a container just because the very top layer of soil looks pale. Always use your finger to test for deep moisture first.
Beginner-Friendly Product Picks
Ditch heavy, cheap soils and plant your garden in a premium, highly aerated medium like Rosy Soil Potting Mix. This biochar-powered blend acts like a smart sponge, maintaining ideal hydration without holding onto excess, air-blocking water.
2. Severe Underwatering
The Symptoms
The entire plant is wilting dramatically. The leaves feel thin, limp, or paper-dry, and the tips and edges are turning a crispy brown. The soil may look visibly cracked or shrunken away from the internal walls of the container, and the entire pot feels completely weightless when you lift it.
Why It Happens
Underwatering usually stems from basic neglect during warm weather or from applying water too quickly. If you just pour a fast cup of water onto a parched pot, the liquid will quickly sheet off the surface and run down the inside walls without ever soaking into the dense, central core of the root ball, where it is desperately needed.
How to Fix It Step-by-Step
- Fill a dedicated watering can with lukewarm water.
- Pour a small amount of water slowly onto the soil surface and wait two minutes for it to sink in. Do not dump it all at once.
- Repeat this slow, incremental pouring process until the soil softens and water begins running freely out of the bottom drainage holes.
- If the plant is severely wilted and the pot is small, place the entire base of the pot into a sink or shallow tray filled with 2 inches of water. Let it sit for 15 minutes to drink from the bottom up, then remove it and let it drain.
How to Prevent It
Make checking your containers an uncompromised part of your morning routine to bypass these kinds of container gardening watering mistakes. Potted plants have a very limited volume of water available to them; during peak summer weather, a single hot afternoon can strip a container of its moisture completely.
Beginner-Friendly Product Picks
To give your plants the best fighting chance against drought, start with premium, resilient, non-GMO seed varieties from Botanical Interests. Their seeds are bred for excellent vigor and rapid, robust root establishment.
3. Choosing the Wrong Pot Type
The Symptoms
Your plants are drying out within mere hours of being watered, requiring you to tend to them multiple times a day, or your soil stays completely waterlogged and muddy for a week straight, causing green algae or fuzzy mold to grow across the surface.
Why It Happens
This mistake happens when you buy planters based entirely on aesthetic style or Instagram trends without considering the physics of the material. Different pot materials interact with water in radically different ways, leading to unexpected container gardening watering mistakes. Porous materials draw water out of the soil; non-porous materials seal it in.
[ UNGLAZED TERRACOTTA ]           [ GLAZED / RESIN ]
  Moisture breathes out              Moisture is sealed inside
   through the walls                  forces water downward
  <--- [Soil] --->                     |  [Soil]  |
  <--- [Soil] --->                     v==[Hole]==v
How to Fix It Step-by-Step
- Identify your personal gardening style. Are you a forgetful waterer or an over-waterer?
- If you are a forgetful waterer who travels frequently, gently transplant your crops out of raw, unglazed terracotta or fabric grow bags.
- Move them into high-quality glazed ceramic, thick plastic, or resin planters that prevent side-evaporation.
- Ensure that whatever new pot you choose has ample, open drainage holes at the very base.
How to Prevent It
Always match the container material to both your lifestyle and the specific plant variety you want to grow. Never put a water-loving plant in a tiny clay pot, and never put a desert-loving plant in a sealed plastic container.
Beginner-Friendly Product Picks
For beautiful, highly reliable, and moisture-stable containers, look through the collection of heavy-duty glazed and premium resin planters at Perfect Plants. They provide an excellent thermal and moisture buffer for sensitive root systems.
4. Using the Wrong Soil Selection
The Symptoms
Water pools on top of your container like a muddy puddle for several minutes before slowly sinking in. When the soil finally dries, it shrinks into a hard, dense brick that cracks down the middle and pulls away from the edges of the pot. Your plants look stunted, pale, and slow to grow.
Why It Happens
This occurs when beginners try to save money by scooping up raw dirt from their backyard yard beds, or by purchasing cheap bags labeled “topsoil” or “garden soil.” These materials are designed for the open ground, where earthworms and natural geology keep things moving. When trapped in a solid pot, the weight of daily watering compacts the fine clay particles together, pressing out all air and trapping roots in a suffocating vise.
How to Fix It Step-by-Step
- Carefully tilt your container and slide the struggling plant out of the compacted dirt.
- Gently massage the root ball to break away as much of the heavy, muddy dirt as possible without tearing the primary root structures.
- Thoroughly wash and sanitize the pot to remove any lingering soil pathogens.
- Repot the plant entirely using a premium, lightweight, soil-less potting mixture.
How to Prevent It
Establish an absolute rule for your patio to avoid these structural container gardening watering mistakes: yard dirt never goes into a container. Always buy bags explicitly labeled as “potting mix” or “container media.”
Beginner-Friendly Product Picks
Banish soil compaction permanently by filling your pots with biochar-infused options from Rosy Soil or custom-blended, professional container mediums from Perfect Plants. These formulas guarantee long-term structure and rapid drainage.
5. Hydrophobic Soil Lockout
The Symptoms
You pour water into your container, and it instantly streams out of the drainage holes at the bottom within two seconds. You assume the pot is fully hydrated, but your plant continues to wilt, look droopy, and decline.
Why It Happens
If a potting mix containing high concentrations of peat moss or wood fibers is allowed to go completely bone-dry, the organic material undergoes a physical transformation. The organic fibers shrink and develop a microscopic, waxy coating that literally repels water molecules. When you irrigate, the water cannot penetrate the root ball; instead, it runs along the path of least resistance—the small gap between the shrunken soil block and the inside wall of the pot—leaving the center roots completely dry.
How to Fix It Step-by-Step
- Locate a large bucket, storage tub, or sink that is wider and deeper than your container.
- Fill the tub with 3 to 4 inches of lukewarm water.
- Set your entire container directly into the water bath. Ensure the water line comes at least halfway up the sides of the pot.
- Leave the pot to sit undisturbed for 20 to 30 minutes. The dry potting mix will slowly use capillary action to wick the water upward, breaking the hydrophobic surface tension and re-swelling the organic fibers.
- Remove the pot from the bath and let all excess water drain away completely.
How to Prevent It
Never allow your potting mix to dry out to the point where it becomes a solid, shrunken brick. If a pot feels incredibly light, check it immediately using the bottom-soaking method before the soil locks up and causes severe container gardening watering mistakes.
Beginner-Friendly Product Picks
Using soil mixes that leverage sustainable biochar, such as Rosy Soil, drastically reduces the risk of hydrophobic lockout because biochar does not lose its structural ability to hold water when completely dried.
6. Inconsistent Irrigation Cycles
The Symptoms
Your cherry tomatoes are splitting open on the vine, or developing sunken, black, leathery patches on the bottom (blossom end rot). Your peppers taste bland or woody, your basil leaves turn bitter, and your flowering baskets drop their blossoms and buds overnight.
Why It Happens
This is the classic “roller coaster” watering mistake. The container goes completely bone-dry and wilts, you panic and flood the pot until it is a muddy swamp, you forget about it for a week until it wilts again, and you repeat the cycle. This extreme fluctuation causes intense cell tissue stress. When a dry plant is suddenly flooded, its cells absorb water faster than they can expand, causing fruit skins to literally rupture and burst.
How to Fix It Step-by-Step
- Use clean pruners to cut off any split fruits, rotted tomatoes, or dead flower stems so the plant stops wasting energy on them.
- Gently rehydrate the dry soil using small, patient increments of water.
- Set a daily alarm or calendar reminder on your smartphone to check your patio at the exact same time every morning.
How to Prevent It
If your work schedule, travel habits, or busy lifestyle make daily checking impossible, you need to automate the process to avoid chronic container gardening watering mistakes. Moving away from manual watering cans toward self-watering or vertical systems removes the human element from the equation.
Beginner-Friendly Product Picks
If you want to grow an abundant food supply on a tight balcony without the stress of daily watering monitoring, invest in the Garden Tower Vertical Planting System. This innovative system grows up to 50 plants in a tiny 4-square-foot footprint and features a smart, centralized design that recycles water and distributes moisture evenly from top to bottom.
7. Midnight or Sundown Soaking
The Symptoms
A strange, white, flour-like powder begins coating the tops of your leaves (powdery mildew). Stems start turning black or brown right at the soil line, or a fine layer of gray, fuzzy mold develops around the base of your herbs and flowers.
Why It Happens
This mistake happens when busy professionals try to adapt gardening to their evening routines. You arrive home from work at 7:30 PM, notice your patio looks a bit dry, and give everything a heavy drenching before going to bed. Because there is no sunlight or midday heat to evaporate excess moisture from the foliage and surface soil, the plants sit in cold, dark, stagnant dampness for 10 to 12 hours straight. This creates the exact microclimate needed for fungal spores to wake up, germinate, and attack your plants.
How to Fix It Step-by-Step
- Carefully cut away and discard any leaves showing signs of white powder, mold, or black decay. Do not compost them, as the spores will survive.
- Immediately cease all evening and night irrigation.
- Shift your watering window entirely to the morning hours.
How to Prevent It
If you absolutely cannot water in the morning, water in the early afternoon (before 3:00 PM) so the sun still has a few hours to dry off the leaves and the top layer of soil before sunset. Always pour water directly onto the soil surface, not over the top of the plant’s leaves.
Beginner-Friendly Product Picks
When you need to water quickly without splashing delicate leaves and inducing common container gardening watering mistakes, use a high-quality watering can or hose attachment equipped with a long, slender spout. This allows you to slide past dense foliage and deliver moisture exactly where it belongs: the root base.
8. Ignoring Local Microclimates
The Symptoms
Your plants look scorched, fried, or dead within a single afternoon, even though you checked the soil and watered them deeply the previous morning.
Why It Happens
Beginners often forget that a balcony, patio, or concrete deck is not a natural field. It is a highly intense microclimate. Concrete floors, brick walls, and glass windows reflect and amplify solar heat, turning a 90°F day into a 110°F root oven. Furthermore, high-rise balconies experience severe, constant wind currents that strip moisture out of leaves via transpiration at double the normal rate. Failing to account for this is one of the easiest container gardening watering mistakes to make.
How to Fix It Step-by-Step
- Step onto your patio during the hottest part of the afternoon (2:00 PM to 4:00 PM) to evaluate the space. Is the floor radiating intense heat? Is the wind howling?
- Group your individual containers tightly together. Clustering pots creates a collective canopy that traps humidity and lowers the local air temperature.
- On exceptionally hot days, temporarily move smaller, sensitive pots into the shade of larger planters or outdoor furniture.
How to Prevent It
Always adjust your watering expectations based on the daily weather forecast. High winds and high heat mean your containers will require double the volume of water compared to calm, overcast days.
Beginner-Friendly Product Picks
To protect exposed soil surfaces from rapid wind and sun evaporation, top-dress your containers with a 1-inch layer of clean straw or fine bark mulch. This acts as a thermal blanket, keeping root zones cool and locking in moisture.
Plant-Specific Container Watering Guidance
Not all plants share the same relationship with water. To ensure your patio garden thrives and stays free of typical container gardening watering mistakes, you must tailor your moisture inputs to the specific variety you are growing.
Herbs
The herb family is split into two distinct watering categories:
- The Drought-Lovers: Mediterranean herbs like rosemary, lavender, thyme, and oregano prefer their roots to sit in dry, highly aerated conditions. Let the top 2 inches of soil dry out completely before watering again.
- The Moisture-Lovers: Soft-stemmed herbs like basil, mint, cilantro, and parsley prefer consistent moisture. Water them the moment the top half-inch of soil feels dry. For best results, sow these using premium seeds from Botanical Interests to ensure rapid, healthy root development.
Tomatoes
Tomatoes are incredibly thirsty, heavy-feeding plants. When grown in a container, a mature tomato plant features a massive root network that transpires water at a rapid rate. During the summer fruiting season, potted tomatoes require deep, heavy watering every single day. Letting them sway between bone-dry and soaking wet will trigger blossom end rot or cause the skins to split.
Peppers
While peppers belong to the same family as tomatoes, they prefer slightly drier conditions. They enjoy a deep, thorough drenching, but they want the top 1 to 2 inches of soil to go dry before the next watering. Stressing hot peppers slightly by letting the soil dry out can actually increase the capsaicin levels, making your peppers spicier.
Flowers
Container annuals like petunias, marigolds, and geraniums require consistent, daily moisture to sustain their heavy production of blooms. Hanging baskets are particularly vulnerable to drying out because they are suspended in mid-air, exposing all sides of the container to drying wind currents. Check hanging baskets daily by lifting them from below to feel their weight.
Succulents & Cacti
These are desert-native plants structurally built to store water inside their fleshy leaves and stems. They absolutely loathe sitting in damp soil, which is one of the most fatal container gardening watering mistakes. Let the entire pot of soil dry out completely from top to bottom before you even consider watering again. When you do water, drench the pot thoroughly until water flows out the bottom, then forget about it for several weeks. Always plant them in a highly porous, specialized substrate like the cactus blend from Perfect Plants.
Patio Houseplants
Moving tropical houseplants (like monstera, pothos, or ficus) out onto a shaded summer patio does wonders for their growth, but you must monitor them closely. The increased airflow and ambient heat mean they will consume water much faster than they do indoors. Check them every two to three days, and never let them sit in a filled, stagnant drainage saucer.
Climate and Environment Adjustments
To maintain a flawless container garden, you must learn to read your environment and adjust your watering habits dynamically as the seasons shift to prevent environmental container gardening watering mistakes.
- Extreme Heat (90°F+): Soil evaporation spikes dramatically. Small pots (under 10 inches in diameter) and fabric grow bags will likely need to be watered twice a day—once at dawn to prepare the plant for the sun, and once in the late afternoon to cool the baking root zone.
- High Wind: Wind strips moisture away from plant tissues via transpiration much faster than raw heat does. If you live on a high-altitude balcony or an open coastal patio, check your soil moisture twice as often on windy days.
- High Humidity: If your local climate is naturally humid and muggy, water evaporates from the soil at a much slower rate. You will need to reduce your watering frequency to prevent the soil from becoming a stagnant, anaerobic swamp.
- Pot Size Matters: Small containers hold a very tiny reservoir of soil and dry out incredibly fast. If you are an absolute beginner, choose pots that are at least 12 to 14 inches in diameter. The larger volume of soil provides a massive moisture safety buffer, giving you a wider margin of error if you forget to water for a day.
The Ultimate Container Gardening Shopping List
If you are ready to bypass the painful learning curve and completely avoid container gardening watering mistakes, skip the bargain-bin products and invest in high-quality gear designed to ensure convenience and gardening success:
- The Soil Foundation: Fill your primary veggie and herb pots with biochar-rich Rosy Soil for built-in water regulation, or select specialized custom mediums from Perfect Plants.
- The Containers: Choose durable, moisture-stable glazed ceramic pots from Perfect Plants, or supercharge your patio’s food production with the self-watering, space-saving Garden Tower.
- The Seeds: Banish grocery store starter-pot disappointment by planting premium, non-GMO, container-friendly varieties from Botanical Interests.
- The Watering Tool: Look for a heavy-duty watering can featuring a long, balanced spout and a removable brass spray rose to distribute water gently without washing away your soil profiles.
Frequently Asked Questions (FAQ) About Container Gardening Watering Mistakes
How do I know if my container needs water?
Never rely on a visual inspection of the soil surface. Always use the mechanical finger test: push your index finger 2 inches deep into the soil. If it feels dry, warm, and loose, it is time to water. You can also judge by weight: lift or tilt your container right after a deep watering to feel its maximum weight, then lift it when it is dry. Your hands will quickly learn to detect a parched pot instantly.
Should I water in the morning or evening?
Early morning is always the absolute best time to water your container garden. It fully hydrates the plant’s vascular system before the stressful midday sun arrives and ensures any water that splashes onto leaves evaporates quickly, preventing fungal diseases. Evening watering leaves plants sitting in stagnant dampness overnight, inviting mold and rot.
Why is my soil pulling away from the inside edges of the pot?
Your soil has become completely hydrophobic. This happens when peat-based potting soils are allowed to dry out completely. The organic fibers shrink away from the container walls and begin actively repelling water molecules. To fix it, you must use the bottom-soaking method: submerge the bottom half of the pot in a tub of water for 20 to 30 minutes until the soil block expands back to the edges.
How do I fix overwatered plants?
First, stop watering immediately and remove any drainage trays holding stagnant water beneath the pot. Ensure the container’s bottom drainage holes are completely open and free of roots or debris. Elevate the pot on bricks or pot feet so air can circulate underneath, and place it in a bright, warm, well-ventilated spot until the soil dries out thoroughly down to the mid-pot level.
How often should I water tomatoes in pots?
During hot, sunny summer weather, large container-grown tomatoes generally need a deep, thorough watering once every single day. If your patio experiences high winds or temperatures exceeding 90°F, you may need to check them twice a day. Always maintain stable, consistent soil moisture to prevent fruit splitting and blossom end rot.
Your Container Gardening Watering Routine
Keep your garden on track and avoid major container gardening watering mistakes by following this simple, structured checklist across the seasons:
Daily Routine
- Walk your patio or balcony every morning before the heat of the day hits.
- Perform the finger test on high-priority, thirsty containers like tomatoes, peppers, and hanging baskets.
- Water deeply using the 3-Step Formula if the soil feels dry at the 2-inch depth.
- Scan for any early visual signs of pests or afternoon leaf droop.
Weekly Routine
- Check your slower-drying, non-porous containers and large glazed ceramic pots.
- Inspect desert-loving varieties like succulents and cacti; water only if the entire pot is bone-dry.
- If you are leveraging a vertical system like the Garden Tower, check and top off the central moisture reservoir.
- Look closely at the lower foliage to ensure no fuzzy mold or powdery mildew is forming.
Monthly Routine
- Take your watering can and perform a heavy, continuous flush of all your pots to wash away any built-up fertilizer salts or municipal tap water minerals.
- Verify that your containers remain elevated on pot feet and that no roots have clogged the drainage holes.
- Top-dress your containers with fresh organic compost or add a fresh layer of mulch to maintain protection against solar evaporation.
Want to Learn More Small-Space Growing Secrets?
If you are ready to bypass the steep learning curve of urban farming entirely, we have built highly detailed, step-by-step systems to help you succeed on your balcony, patio, or deck. Explore our deep-dive soil guide, our comprehensive pot selection guide, our beginner herb guide, and our tomato container guide over on our main site at containergardeningebook.com/blog.
You are not a plant killer. You never were. You just needed a simple, reliable system to manage the unique physics of potted water. Now you have one. Grab your tools, pick up some premium seeds, and watch your compact space transform into a lush, rewarding paradise.
Leave a Reply